When it comes to plumbing a laundry sink, there are a few key steps you need to follow to ensure a successful installation. Did you know that having a laundry sink can greatly enhance the functionality and convenience of your laundry room? Not only does it provide a dedicated space for handwashing and stain removal, but it can also serve as a utility sink for other household tasks like cleaning paintbrushes or soaking dirty items.
Plumbing a laundry sink requires careful planning and execution. Before you begin, it’s important to understand the basic principles of plumbing and have the necessary tools and materials on hand. A laundry sink is typically connected to the existing plumbing system, which involves installing hot and cold water supply lines, a drain, and a vent. It’s essential to ensure proper alignment and sealing to avoid leaks or drainage issues. By following these steps and utilizing proper techniques, you can successfully plumb a laundry sink that meets your needs and enhances the functionality of your laundry room.
To plumb a laundry sink, follow these steps:
- Turn off the water supply.
- Remove the old sink and faucet.
- Install the new sink and faucet, ensuring proper alignment and sealing.
- Connect the drain pipe to the sink’s drain outlet.
- Connect the water supply lines to the faucet.
- Turn on the water supply and check for any leaks.

The Basics of Plumbing a Laundry Sink
Plumbing a laundry sink is an essential task for homeowners who want to maximize the functionality of their laundry area. Whether you are installing a new laundry sink or replacing an old one, understanding how to properly plumb it is crucial to ensure smooth water flow and proper drainage. In this guide, we will walk you through the step-by-step process of plumbing a laundry sink, from selecting the right materials and tools to connecting the necessary pipes. By following these instructions, you’ll be able to successfully install or replace a laundry sink in your home.
1. Gather the Necessary Materials and Tools
The first step in plumbing a laundry sink is to gather all the necessary materials and tools. Here is a list of items you will need:
- Laundry sink
- P-trap
- Tailpiece
- Drain pipe
- Shutoff valves
- Flexible supply lines
- Plumber’s tape
- Adjustable wrench
- Hacksaw
- Bucket
Make sure to choose high-quality materials that are suitable for plumbing applications to ensure durability and long-lasting performance. Additionally, ensure that you have the appropriate tools to complete the installation or replacement.
2. Shut Off the Water Supply
Before you begin the plumbing process, it is crucial to shut off the water supply to avoid any water leakage or damage. Locate the main water valve in your home and turn it off. It is usually located near the water meter or at the water entrance point.
3. Remove the Old Sink (If Applicable)
If you are replacing an old sink, you’ll need to remove it first. Start by disconnecting the plumbing connections and removing any brackets or clips that hold the sink in place. Use a wrench to loosen and disconnect the supply lines and remove the sink from its countertop or cabinet.
4. Install the P-Trap and Tailpiece
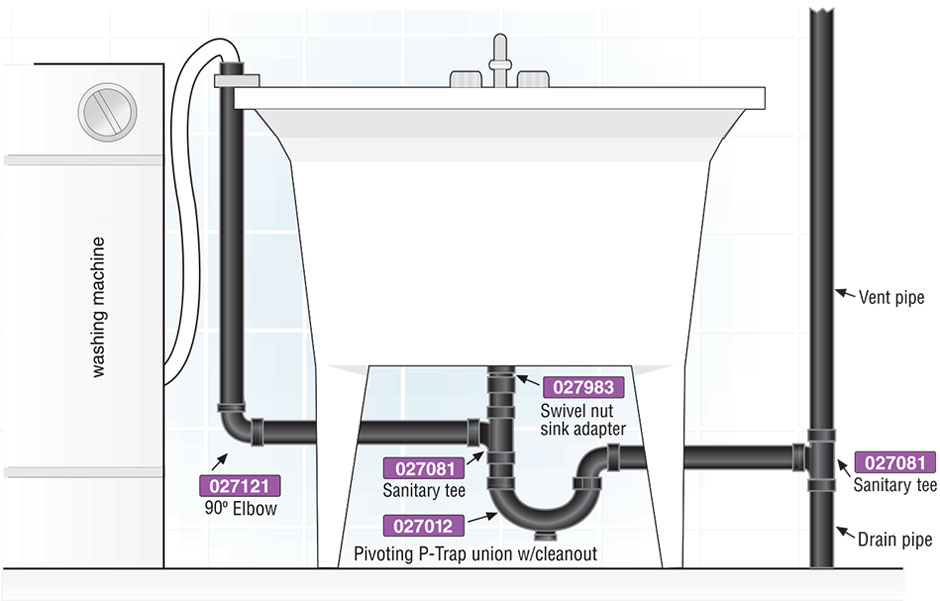
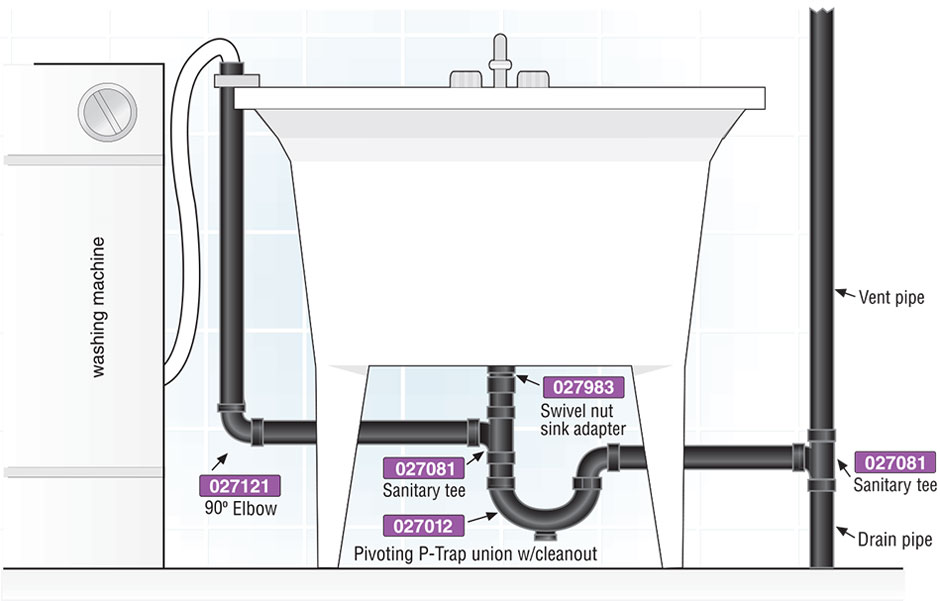
The P-trap and tailpiece are essential components of a properly functioning sink drain system. Start by attaching the tailpiece to the sink drain opening using plumber’s tape to ensure a watertight seal. Then, attach the P-trap to the tailpiece and the drain pipe, making sure all connections are secure.
5. Connect the Supply Lines
Next, connect the supply lines to the shutoff valves and the faucet. Use an adjustable wrench to tighten the connections, making sure they are secure. If you are installing a new faucet, follow the manufacturer’s instructions for proper installation.
2. Adding the Finishing Touches
Once you have completed the initial plumbing steps, it’s time to add the finishing touches to your laundry sink installation. Here are a few important steps:
1. Test for Leaks
Turn on the water supply and check for any leaks. Inspect all connections and joints to ensure there are no water drips or seepage. If you notice any leaks, tighten the connections or use plumber’s tape to create a watertight seal.
2. Secure the Sink
If you are installing a new sink, make sure it is securely fastened to the countertop or cabinet. Use brackets or clips provided by the manufacturer to ensure stability.
3. Clean Up
After completing the installation, clean up any debris or materials from the work area. Dispose of the old sink responsibly and ensure the area is clean and tidy.
Now that you have successfully plumbed your laundry sink, you can enjoy the convenience and functionality it brings to your laundry area. Remember to regularly inspect and maintain your plumbing system to prevent any issues in the future. By following these steps and using high-quality materials, you can ensure a reliable and long-lasting plumbing installation.
Plumbing a Laundry Sink: A Professional Perspective
Plumbing a laundry sink requires careful planning and precision to ensure proper functionality. Here are the steps to follow when installing a laundry sink:
- Choose the right location for the sink, keeping in mind access to water and drainage lines.
- Shut off the water supply and drain any existing pipes connected to the area.
- Install a new water supply line by connecting it to the main water line and extending it to the sink location. Use appropriate fittings and ensure a secure connection.
- Connect the sink drain to the existing main drain line. Use a P-trap to prevent odors from entering the room.
- Test the connections by turning on the water supply and checking for any leaks. Make necessary adjustments if required.
- Seal the sink to the countertop or wall to prevent water damage. Use a waterproof caulk or adhesive for a secure bond.
Following these steps will ensure a professionally plumbed laundry sink, providing convenience and functionality for your laundry area.
Key Takeaways: How To Plumb A Laundry Sink?
- Ensure you have the necessary tools and materials before starting the plumbing project.
- Start by shutting off the water supply to the area where you’ll be installing the sink.
- Install the drainpipe and the trap, ensuring they are properly aligned and secure.
- Connect the water supply lines, using the appropriate fittings and ensuring there are no leaks.
- Test the sink by running water through it to check for any leaks or drainage issues.
Frequently Asked Questions
Here are some common questions about plumbing a laundry sink:
1. What are the basic steps to plumb a laundry sink?
The basic steps to plumb a laundry sink include:
1. Choose the location for your laundry sink and mark the area where you want to install it.
2. Install a drainpipe for the sink. This will involve cutting into your existing plumbing system and connecting the new drainpipe using appropriate fittings.
2. How do I connect the laundry sink to the main water supply?
To connect the laundry sink to the main water supply, follow these steps:
1. Shut off the main water supply before starting the installation process.
2. Connect the flexible lines from the sink faucet to the hot and cold water supply lines.
3. What tools do I need to plumb a laundry sink?
To plumb a laundry sink, you will need the following tools:
1. Pipe cutter or hacksaw for cutting the pipes.
2. Adjustable wrench for tightening fittings.
3. Plumber’s tape for securing threaded connections.
4. Can I install a laundry sink without professional help?
Yes, you can install a laundry sink without professional help if you have basic plumbing skills and knowledge. However, if you are unsure about any steps or if the installation requires major modifications to your plumbing system, it is recommended to hire a professional plumber.
5. Is it necessary to have a vent for a laundry sink?
Yes, it is necessary to have a vent for a laundry sink. The vent allows air to enter the plumbing system, preventing airlock and ensuring proper drainage. Without a vent, you may experience slow draining or gurgling noises from the sink.
Laundry sink
Plumbing a laundry sink can seem like a daunting task, but with the right guidance, it can be a straightforward process. Start by gathering all the necessary tools and materials, including a sink, faucet, drain pipe, and connectors. Then, follow these steps:
- Turn off the water supply and drain any remaining water from the pipes.
- Measure and mark the location for the sink, ensuring it’s near existing plumbing lines for easy installation.
- Install the sink by connecting the faucet and drain pipe according to the manufacturer’s instructions.
- Connect the P-trap and attach it to the existing plumbing drain line.
- Turn on the water supply and check for any leaks. If necessary, make adjustments to ensure a tight seal.
By following these steps, you can successfully plumb a laundry sink and enjoy its convenience for years to come. Remember to always consult a professional or do thorough research if you encounter any difficulties. Happy plumbing!

