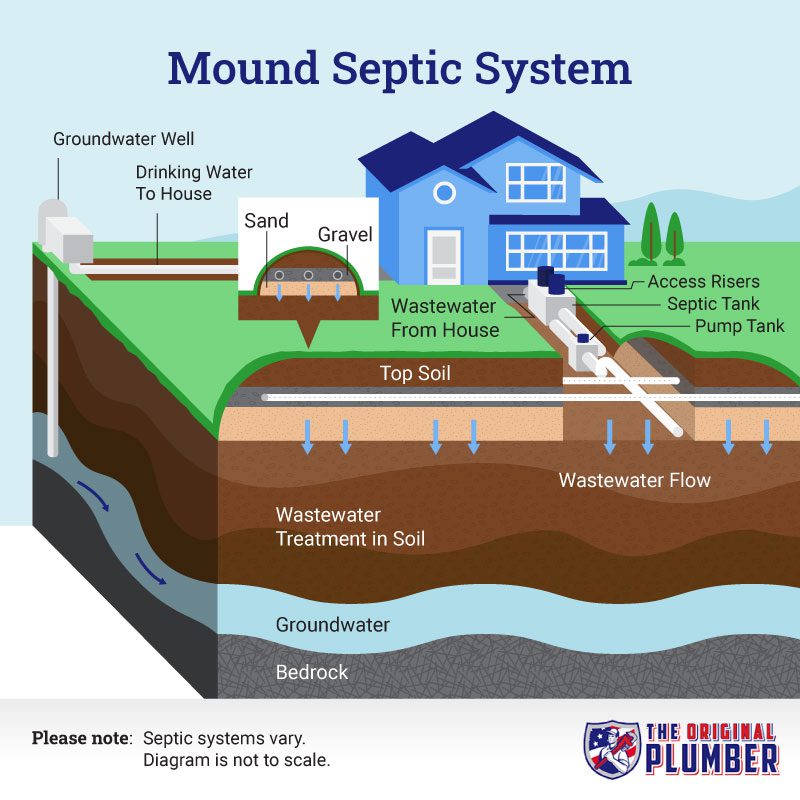
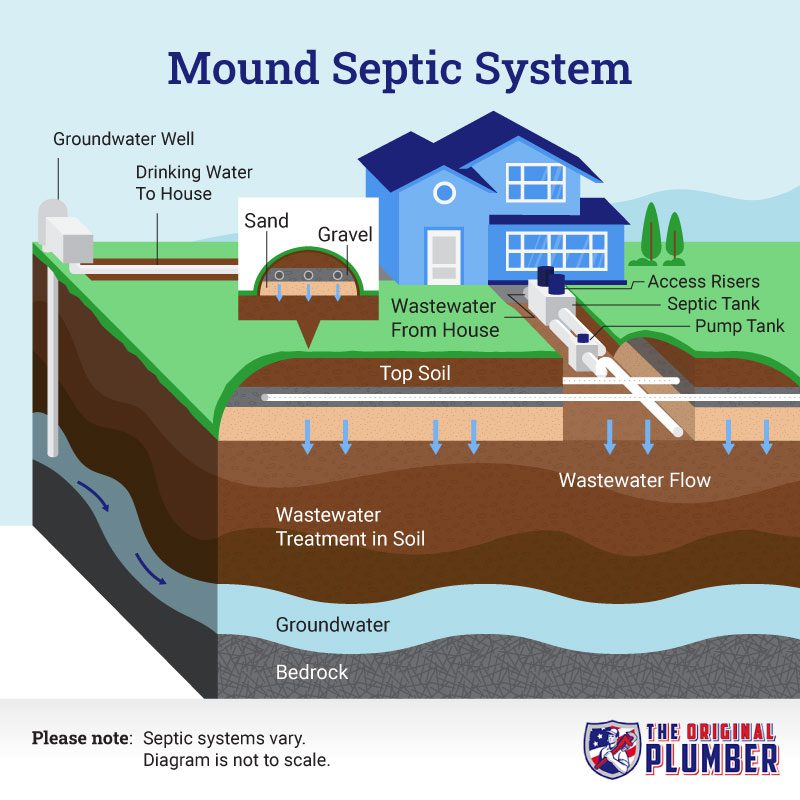
When it comes to plumbing a septic tank, there are important steps that must be followed to ensure the proper functioning of the system. Did you know that a septic tank is an underground chamber made of concrete, fiberglass, or plastic that collects and decomposes sewage? It plays a crucial role in wastewater treatment for homes and buildings that are not connected to a municipal sewer system. By understanding how to properly plumb a septic tank, you can maintain a functional and efficient system.
Plumbing a septic tank involves several key aspects. First, it is essential to understand the history and background of septic tank systems, which have been in use for centuries. These systems have evolved and improved over time, and today, they are designed to effectively treat and dispose of wastewater. A significant aspect of plumbing a septic tank is to ensure that it is properly sized, based on factors such as the number of occupants in the building and the estimated daily water usage. Additionally, regular maintenance and inspection of the system are crucial to identify any potential issues early on and prevent costly repairs. By following these steps, you can help maintain a healthy and efficient septic tank system for years to come.
To successfully plumb a septic tank, follow these steps:
- Locate the septic tank and measure the distance between it and the house.
- Dig a trench from the house to the septic tank, ensuring it has a slight downward slope.
- Install a PVC pipe in the trench, connecting it to the septic tank’s inlet.
- Connect another PVC pipe from the septic tank’s outlet to the drain field.
- Cover the trench with gravel and soil, ensuring it is level.

Understanding the Plumbing Process for a Septic Tank
Plumbing a septic tank is an essential aspect of maintaining a functional and efficient septic system. Proper plumbing ensures the correct flow of wastewater from your home to the septic tank, preventing backups, blockages, and other plumbing issues. Understanding the process of plumbing a septic tank can help you make informed decisions, ensure proper installation, and maintain the longevity of your septic system. In this article, we will guide you through the step-by-step process of plumbing a septic tank, covering everything from the initial planning to the final connections.
Step 1: Assessing Your Plumbing Needs
The first step in plumbing a septic tank is assessing your plumbing needs. This involves determining the number of fixtures in your home, such as toilets, sinks, showers, and laundry machines, that will be connected to the septic system. By calculating the fixture units, you can determine the size and capacity of the septic tank required for your household. It is important to consider both the present and future needs to avoid the need for costly upgrades in the future.
Additionally, you need to assess the layout of your property and identify the optimal location for the septic tank and drainfield. The distance from your home, soil conditions, and local regulations play a crucial role in determining the placement of the septic tank. Consulting with a professional septic system installer or engineer can help ensure that you choose the most suitable location for your septic system.
Furthermore, you should familiarize yourself with the local building codes and regulations governing septic tank installations. Each jurisdiction may have specific requirements regarding septic system design, setbacks, and permits. Adhering to these regulations is essential for avoiding legal issues and ensuring the proper functioning of your septic system.
Step 2: Excavation and Installation
Once you have assessed your plumbing needs and determined the ideal location for your septic tank, the next step is excavation and installation. This involves digging a hole or trench to accommodate the septic tank and drainfield according to the approved design and layout.
During the excavation process, it is important to ensure that the hole is properly leveled, allowing for proper drainage and easy access for maintenance. The soil should be compacted and stabilized to prevent settling and potential damage to the septic system.
Installing the septic tank involves carefully placing it in the excavation, ensuring it is level and properly aligned with the inlet and outlet pipes. The necessary connections, such as sanitary tees, baffles, and risers, should be securely installed to facilitate the flow of wastewater and prevent debris from entering the system.
It is important to note that the installation of a septic tank should be carried out by a licensed professional who is experienced in septic systems to ensure compliance with regulations and proper installation techniques.
Step 3: Plumbing the Drainpipes
Plumbing the drainpipes is a crucial step in the process of plumbing a septic tank. The drainpipes connect the fixtures in your home to the septic tank, allowing for the proper flow and disposal of wastewater.
When plumbing the drainpipes, it is essential to ensure that the pipes are correctly sized and sloped for proper drainage. A professional plumber will be able to determine the appropriate pipe size and slope based on the fixture units, distance, and other factors.
The drainpipes should be securely connected to the septic tank using watertight fittings to prevent leaks and infiltration of groundwater or roots. Additionally, it may be necessary to install cleanouts and inspection ports along the drainpipes to facilitate maintenance and troubleshooting.
It is crucial to follow building codes and regulations when plumbing the drainpipes to ensure compliance and avoid potential plumbing issues in the future.
Step 4: Ventilation and Odor Control
Ventilation and odor control are essential aspects of plumbing a septic tank. Proper ventilation allows for the release of gases, such as methane, produced during the decomposition process in the septic tank. It also helps prevent the buildup of pressure, which can lead to system malfunctions and foul odors.
A vent pipe should be installed on the plumbing system to provide adequate ventilation. This pipe extends from the septic tank to the open air, allowing for the release of gases. The vent pipe should be properly sized and located to ensure efficient ventilation and prevent odors from entering the home.
In addition to ventilation, various odor control measures can be implemented to minimize unpleasant odors associated with septic systems. These include using bacterial additives, installing odor filters on the vent pipe, and maintaining regular septic tank pumping and maintenance.
Maintaining Your Plumbing System
Proper maintenance is crucial for the functionality and longevity of your plumbing system and septic tank. Here are some essential maintenance tips:
- Schedule regular inspections and pumping to remove accumulated solids and prevent system failures.
- Avoid disposing of non-biodegradable items, grease, chemicals, and excessive solids down the drains.
- Maintain the drainfield area by avoiding heavy machinery, excessive foot traffic, and planting deep-rooted trees or plants.
- Conserve water to prevent overloading the septic system.
- Address plumbing issues promptly to prevent further damage to the septic system.
By following these maintenance tips and seeking professional help when needed, you can ensure the optimal performance of your septic system and plumbing.
Plumbing a Septic Tank: A Step-by-Step Guide
Plumbing a septic tank is a crucial step in ensuring proper waste management and preventing any potential health hazards. Here is a step-by-step guide to assist you in this process:
1. Consult a Professional
Before starting any plumbing work, it is advisable to consult a professional septic tank contractor or plumber. They can assess your specific situation and provide expert advice.
2. Understand the System
Make sure you understand the layout and components of your septic tank system. Familiarize yourself with the main tank, distribution box, and drain field to avoid any mistakes during the plumbing process.
3. Gather the Necessary Tools and Materials
Collect all the required tools and materials before beginning the plumbing project. This may include piping, connectors, wrenches, and sealants. Inspect them for any signs of damage or defects.
4. Plan the Plumbing Layout
Sketch a layout plan for the plumbing system, taking into account the distances between the different components and any local regulations. This will ensure a well-designed and efficient system.
5. Install the Piping
Carefully install the required piping, ensuring proper connections and fittings. Avoid any sharp bends or restrictions that could hinder the flow of waste water.

