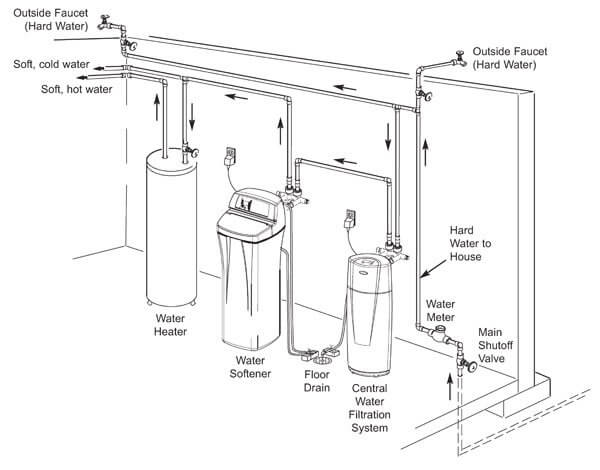
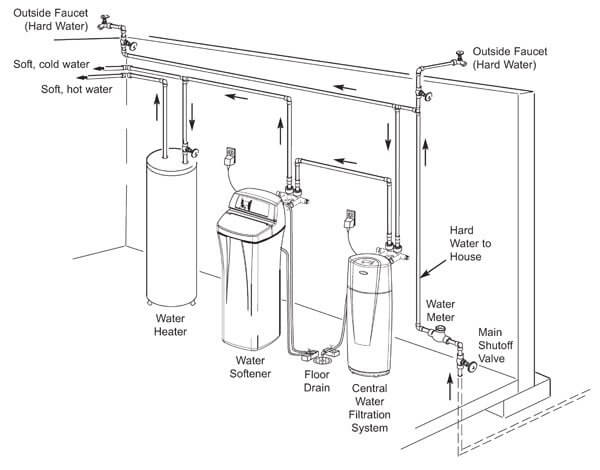
When it comes to plumbing a water softener, there are key steps you need to follow to ensure an efficient and effective installation. Water softeners are essential in removing minerals like calcium and magnesium from your water supply, preventing buildup and improving the lifespan of your appliances. So, if you’re looking to reap the benefits of softened water, read on to discover the proper way to plumb a water softener.
First and foremost, it’s crucial to understand the history and background of water softeners. The concept of water softening dates back centuries, with early civilizations using various methods to reduce the negative effects of hard water. Fast forward to the present day, and advancements in technology have made water softeners more efficient and accessible than ever before. In fact, studies show that using a water softener can extend the lifespan of appliances like dishwashers and water heaters by up to 50%. With this knowledge in mind, you can now proceed with the installation process, ensuring your home benefits from the advantages of a water softener system.
To plumb a water softener, follow these steps:
- Locate a suitable installation spot near the water supply line.
- Turn off the water supply to the house.
- Cut the water supply line and install a bypass valve.
- Connect the water softener inlet to the bypass valve.
- Connect the water softener outlet to the water heater inlet.
- Connect the drain hose from the water softener to a floor drain or utility sink.
- Turn on the water supply and check for any leaks.
- Follow the manufacturer’s instructions for programming and maintaining the water softener.

Understanding the Basics of Water Softener Plumbing
Installing a water softener in your home can significantly improve the quality of your water by removing minerals that cause hardness. However, proper plumbing is crucial to ensure the efficient functioning of your water softener system. Understanding how to plumb a water softener correctly is essential to avoid common installation mistakes and maximize the benefits of your equipment. In this guide, we will explore the key steps involved in plumbing a water softener and provide expert tips to help you through the process.
Determining the Ideal Location
The first step in plumbing a water softener is to determine the ideal location for installation. Consider the following factors:
- Proximity to the water mainline: The water softener should be installed close to the main water supply to allow for easy access.
- Access to a drain: A water softener requires regular backwashing and regeneration cycles. Ensure that there is a nearby drain for this purpose.
- Space allocation: Water softeners come in various sizes, so make sure to allocate enough space for installation.
- Avoiding direct sunlight: Direct sunlight can damage the control valve of the water softener, so choose a shaded area for installation.
Once you have determined the ideal location, you can proceed with the next steps of the plumbing process.
Shutting Off the Water and Cutting Pipes
Prior to plumbing the water softener, it is essential to shut off the water supply to your home. Locate the main shut-off valve, usually found near the water meter, and turn it off. This will ensure a smooth installation process without any water leakage.
Next, you will need to cut the pipes to make room for the water softener connections. Ideally, you should install the water softener near the water heater or after the pressure tank. Begin by marking the section of the pipe where you plan to make the cut. Use a pipe cutter or hacksaw to cut the pipe precisely.
Remember to measure accurately and use the appropriate pipe size to ensure a secure connection with the water softener.
Installing Bypass Valves
Bypass valves are essential components of a water softener system as they allow you to redirect water flow when necessary, such as during maintenance or repairs. To install bypass valves, follow these steps:
- Take the appropriate size of copper or PVC pipe and connect it to the water softener’s inlet and outlet ports.
- Attach shut-off valves to both ends of the pipe to control the water flow.
- Connect the bypass valve, which typically comes with the water softener, to the shut-off valves.
- Ensure that the bypass valve is set to the “Service” position for normal water softener operation.
The bypass valve allows you to isolate the water softener from the main water supply whenever required.
Connecting the Water Softener
To connect the water softener, follow these steps:
1. Attach the appropriate plumbing fittings, such as compression or sweat fittings, to the inlet and outlet ports of the water softener.
2. Connect the inlet pipe to the water softener’s inlet port and the outlet pipe to the outlet port. Ensure that the connections are secure and leak-free.
3. If the water softener requires an electrical connection, follow the manufacturer’s instructions to connect it to a power source.
4. Once the connections are complete, turn on the main water supply and check for any leaks. If there are any leaks, tighten the fittings or connections as needed.
Adding Salt to the Water Softener
After successfully plumbing the water softener, the final step is to add salt to the system. Different water softeners have varying requirements for the type and amount of salt to use. Refer to the manufacturer’s instructions for the specific guidelines.
Typically, the salt is added to a brine tank, which is responsible for the regeneration process of the water softener. Make sure to monitor the salt levels regularly and replenish as needed to ensure the continuous functioning of the system.
Congratulations! You have successfully installed and plumbed a water softener in your home. Enjoy the benefits of softened water and reduced mineral buildup in your appliances and plumbing fixtures.
Plumbing a Water Softener: A Step-by-Step Guide
Installing a water softener is a crucial step in ensuring clean and healthy water supply in every household. Here is a professional step-by-step guide to help you properly plumb a water softener.
- Locate the best position: Find a suitable location near the main water supply, ensuring easy access for maintenance.
- Shut off the main water supply: Turn off the water supply to your house using the main shut-off valve.
- Prepare the pipes: Cut the pipes and install elbow fittings as necessary to create a bypass loop for the water softener.
- Connect the bypass valve assembly: Connect the bypass valve assembly to the inlet and outlet pipes.
- Install the water softener: Mount the water softener unit on a stable surface, then connect it to the bypass valve assembly.
- Connect to the drain: Connect the drain line from the water softener to an appropriate drain outlet.
- Turn on the water supply: Slowly open the main water supply valve to allow water to flow through the system.
- Test the water softener: Check for any leaks and run a regeneration cycle to ensure proper functioning.
Remember, if you are uncertain about any step, it is always best to consult a professional plumber to avoid any potential issues or damage to your plumbing system.
Key Takeaways: How To Plumb A Water Softener?
- Choose a suitable location for your water softener installation.
- Turn off the main water supply and drain the pipes before starting the installation.
- Install a bypass valve to allow easy maintenance and servicing of the water softener.
- Connect the inlet and outlet fittings of the water softener to the existing plumbing system.
- Follow the manufacturer’s instructions for programming and setting up your water softener.
Frequently Asked Questions
Here are some commonly asked questions about plumbing a water softener:
1. What is the best location to install a water softener?
The best location to install a water softener is near the point where the water main enters your home. This allows the softened water to be distributed throughout the entire plumbing system. It is also recommended to install the water softener in an area with good ventilation, away from direct sunlight and extreme temperatures.
Additionally, ensure that there is enough space for the water softener unit and easy access for maintenance and salt refilling.
2. Do I need to install a bypass valve for my water softener?
Installing a bypass valve is highly recommended for your water softener. This allows you to temporarily bypass the water softener during maintenance or in case of any issues. It also helps conserve salt and water by diverting water that does not need to be softened.
Make sure the bypass valve is installed correctly and easily accessible.
3. How do I connect the water softener to the plumbing system?
To connect the water softener to the plumbing system, you will need to cut into the main water supply line. This is typically done using a pipe cutter or hacksaw.
After cutting the pipe, install the appropriate fittings, such as valves and connectors, to connect the water softener. It is important to follow the manufacturer’s instructions and ensure proper sealing to prevent leaks.
4. How do I flush the water softener after installation?
After installing the water softener, it is important to flush the system to remove any loose resin or debris that may have accumulated during installation. This can be done by running water through the system for a few minutes.
Open all faucets throughout the house and let the water run for a sufficient amount of time to ensure a thorough flush.
5. How often should I clean or maintain my water softener?
Your water softener should be cleaned and maintained regularly to ensure optimal performance. It is recommended to clean the brine tank, inspect and replace the resin if needed, and refill the salt as necessary.
Check the manufacturer’s instructions for specific maintenance guidelines, but generally, it is advised to clean and maintain your water softener every 6 to 12 months.
How to Install a Water Softener | This Old House
In conclusion, plumbing a water softener is a straightforward process that can greatly improve the quality of your water. By following the steps outlined in this guide, you can ensure that your water softener is properly installed and functioning optimally.
Remember to turn off your water supply before starting the installation process and to follow all safety precautions. Additionally, it is important to regularly maintain and clean your water softener to prolong its lifespan and efficiency. With the right tools and knowledge, you can enjoy the benefits of soft, clean water in your home.

